Showing posts with label play with paper. Show all posts

Wednesday, December 15, 2010

Roundup: Printable Tags

I'm not much for fussy gift-wrap; just not something I feel like I have time for in my life right now. I'm into "brown paper packages tied up with string." And it's a win/win because brown paper+cute string+cute tag=charming gift!

Today we want to help you with the "cute tag" part. There are so many great free printables in the interwebs, but finding them can feel akin to looking for the one cute top lurking in all the horrors at ROSS. We don't want you to have to do that, so we rounded up some goodies for you:

Vintage Style Tags via Nice Package

Personalized Labels via Martha

Reindeer & Lights Tags via Creature Comforts
***Check out their whole series of free printables (gift tags, food labels, etc.) Fantastic!***


These little sweeties via Black Apple


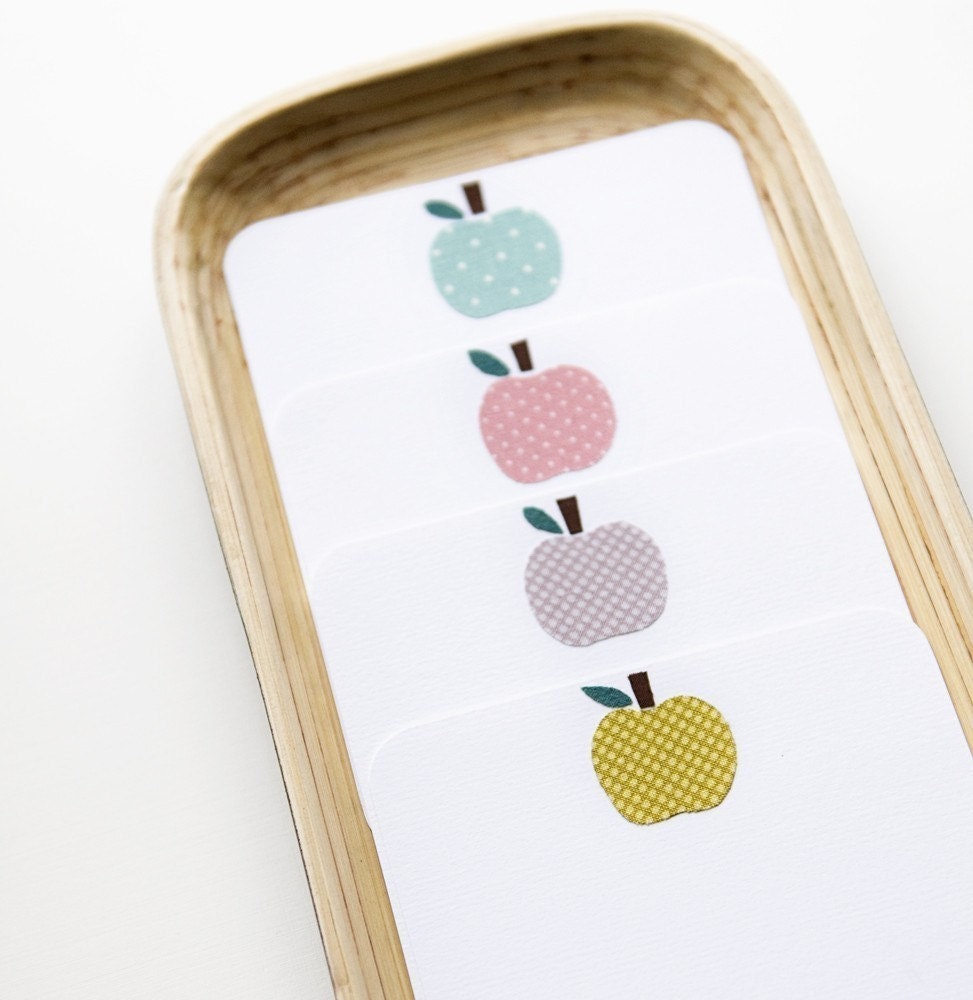
Love the colors & the modern edge of this set via Paper Crave.


This last one is not a gift tag, but we wanted to post this Christmas subway art that Amanda Stringham created and shared with us. A beautiful reminder to print and enjoy for this time of year.

Regardless of the trimmings & trappings, we hope you find great joy in your gift-giving this year.


Don't forget there's still time to enter the Smitten Blog Designs Giveaway -
you could win a brand new custom
look for your blog!

Thursday, July 22, 2010

Craving Creativity?


Do you have a hankering for a Summer project? Sometimes, even though I have laundry to fold and dishes to put away, I just want to work on something FUN while my boys are turning the sandbox into a mudbox or wrestling on my bed.

So today I'm sharing some tutorials for anyone who wants to get her craft on...

Remember when a bunch of you asked for tutorials following our Post-Christmas Handmade Gift Parade? Six months later, we are following through! The two most requested:
-Rosette corsage
-Little boy tie

You can find rosette instructions from the ever creative Sarah Nielsen here. They can be glued to a pin like mine or strung as a fabulous garland, as per Sarah's tutorial.

Also, Danielle taught me how to make rolled flower rosettes here. I have been making a bunch for bobby pins. They're especially easy because you can use random old fabric scraps and do them while watching TV, while your kids bathe, etc. (I even made a bunch on a car trip (in the passenger seat, obviously!) this spring! Love multi-tasking!)

As for the little neckties, try this tutorial or this one--in which you make a little tie from a man's tie. So darling!

Another project idea I am completely enamored with: Liz Stanley's personalized Memory Game. I can't wait to make one for my boys!

Next: Yes, I have two sons, but I really want to make a couple of these skirts for the daughter of my dreams. Oliver + S has the most darling patterns, and this one is free! If you don't feel like a confident seamstress yet, THIS IS FOR YOU!

Now that's five fun project ideas my dears. I've pretty much realized that if you require yourself to do everything on your to-do list first every day, and tell yourself you'll do something fun later, the fun stuff never happens. Sometimes it does a soul good to put the mop down for a half-hour and create.

Feel free to share other projecty links that we might love!
--anne

Thursday, June 10, 2010

Lovely Lettering by Bloom Guest Gina of Letter Girl

Gina, (also known as Letter Girl), is here to share a few tips about how to pretty-up our handwriting. It only took a few minutes on her blog, Rich Inner Life, to realize that Gina was not only someone we'd love to feature at Bloom, but also someone I wished I could know in real life. We are so honored to have her at Bloom today sharing some of her creativity!


Just about everything is easier when you can break it down into little steps: following a recipe, going on a road trip, setting a new goal. Today I’d like to share how to improve your handwriting by just trying a few simple steps.

The first step is to pull together some samples of handwriting you love. Chances are, if you want to make your own writing better, you’ve probably seen some writing that you aspire to. I keep an idea file when I see writing I admire (or anything else that inspires me, for that matter). Looking at great writing can help train your eye: look at spacing, the line weight (how thick or thin it is), the balance on the page; feel the emotion the lettering evokes; let your mind wonder to all the ways you would use your own handwriting if you could write like that.

When you’re ready to try writing something yourself, a list is a great place to start: a grocery list, a to-do list, a books-to-read list, clues for a treasure hunt. Spend just a minute or two more than you normally would on every day lists.

As you practice more, think about the spacing between lines, then the spacing between letters. A list on separate pieces of paper is a wonderful way to practice, and a great thing to include on a scrapbook page because if you make a mistake, you can just start over on a new little piece of paper, without wasting all the time you’ve already spent.

The best piece of advice is, of course, also the most simple: practice. When I look at this recipe card from 1984, it’s hard to believe that’s my own writing!


After 18 years of daily practice, my handwriting still changes a bit from day to day. (And my signature is still pretty much illegible, as my children are quick to point out.) I hope you’ll stop by my blog in July, when I’ll be featuring handwritten quotations every day.


Raise your hand if you're about to go find some scratch
paper and a pen to start practicing your penmanship.

Thanks for the tips, Gina!

Wednesday, June 9, 2010

Simple Silhouettes

Photobucket

When I was in elementary school, my mom used to have us sit very still for twenty minutes while she would trace our profile, which was being projected on the wall by a lamp. It was tricky and time-consuming, to say the least, but all the children loved the silhouettes that hung upstairs.

Silhouettes are everywhere right now, and I never grow tired of them. There is something so classic and timeless about a silhouette. I wanted to make some of my family, but knew the old 'hold still for twenty minutes' trick wasn't going to work for the 2-4 age group. Guided by some instructions from Stephanie Nielson and my cousin, Christina, I used the simplest method imaginable to make our silhouettes.

Here's what you do:

1. Photograph each family member's profile. Be careful to make the dimensions the same for each person.

2. Upload the photos to your computer and select the size of photo you want. (Mine are 8x10.) Print the photos on card stock.

3. Carefully cut out the profiles. Pay attention to the tiny details--cowlicks, etc.--they make all the difference. (I may or may not have fudged and made my eyelashes extra long.)

4. Spray paint the silhouettes black (I used a matte finish.)

5. Mount the silhouettes on a white background and frame them.

Any questions?
xo,
anne

Thursday, May 13, 2010

Any Way You Say It...

We like the idea of familiar traditions for special days.
For birthdays, we think it's fun to say, "Happy Day!" in a memorable, creative way.

Here are a few simple ways to do it:

A Birthday Pennant Banner
(even more sentimental if made by a dear friend - thanks, Anne!)

Another variation:

Remember these felted darlings that Lindy donated to the charity auction for Claire?
So charming.

Twine & Paper Garland

I whipped this little number up in about an hour the night before Henry's birthday this year. I was craft-hungry and you know I love to play in my paper collection...


Magazine cut-outs

Anne's b-day greeting for her lovie one year...

Ecclectic and upcycled :)


Do you have any fun Happy Birthday traditions?

Tuesday, February 2, 2010

Valentine's Inspiration

Just want to point you in the direction of some charming Heart-day ideas across the interwebs.


Heart shaped paper clips at How About Orange


Valentine's Day Matchboxes at Inchmark


Sewn valentine's at purl bee


Darling printable Valentines at Inside A Black Apple


Or stop by Martha's place and cry in your tea 'cause you can't devote your entire life between now and Feb 14th to making charming homemade Valentine's.


Heart,
Em

Wednesday, December 23, 2009

Twisted Paper Snowflake by Simply Modern Mom

3 snowflakes

Hi. It's Tiffany from Simply Modern Mom. Here we are a few days away from Christmas and I'm happy to be on Bloom to share with you my snowflake designs. I am not a winter person having grown up in Hawaii and Georgia. So to get me into the winter mood, I designed three different paper snowflakes to decorate my house and something to do with the kids. Then when Emily asked me to do a guest post for Bloom, I decided to come up with this fourth design for the special occasion.

twisted paper snowflake

You can find all the tutorials at Simply Modern Mom: the piping paper snowflake, the twirly paper snowflake and the cookie cutter paper snowflake. This tutorial is the twisted paper snowflake (nicknamed crazy octopus), which is a combination of both the piping and twirly snowflake.

Supplies:

  • cardstock paper
  • 8 markers, pens or pencils
  • 4 pipe cleaners/chenille
  • paper cutter, scissors
  • ribbon, string or thread
  • needle
  • hole punch or other embellishments for the center
  • glue
  • low adhesive tape
1. Cut 9 strips of cardstock 3/4" x 6".

octopus snowflake strips


2. Place glue at one end of the first strip. Then make a ring, only to one strip of cardstock.

octopus snowflake glue

octopus snowflake ring


3. Fold one end of the remainder 8 strips at 3/4".

octopus snowflake fold


4. Tape one of the strip diagonally to the markers, then wrap it around and tape the second end. Do to all 8 strips. Allow the paper to settle for at least an hour. The longer the better.

octopus snowflake twist markers


5. While waiting for the twists to settle. Take your pipe cleaners and mark at the edge of the ring where the holes need to be. There will be 8 holes all evenly spaced.

octopus snowflake markings


6. Unwrap the twisted strips then apply glue to the end where you had previously folded at 3/4".

octopus snowflake curls

octopus snowflake curl glue


7. Glue the strips of twisted paper onto the ring according to the markings previously made with the pipe cleaners. Make sure they are all equally spaced.

octopus snowflake legs


8. Use a small hole punch or scrapbooking hole punch with hammer tools to punch holes in the middle of each glued ends on the ring.

octopus snowflake holes


9. Pull the pipe cleaners through the holes across from each other. Then wrap the curls around the pipe cleaners.

octopus snowflake piping

10. Trim off excess pipe cleaner ends.

octopus snowflake trim


11. Use needle to attach ribbon or thread to the snowflake to hang. Optional, apply embellishments to center of the snowflake.

octopus snowflake needle

twisted snowflake


Thanks for the great tutorial, Tiffany. I think a twirly collection of these whimsical flurries might be just the thing to keep the January doldrums at bay :)

Tuesday, December 15, 2009

Gift Tags & Present Toppers


images courtesy of
Brooke Reynolds at Inchmark

Sometimes you find a little treasure in the ether that you just need to share. That's how I feel about the gift tags Brooke posted at Inchmark last Christmas. So simple. So darling. That's pretty much what you get at Inchmark: Simple & Darling. Every time. It's one of my favorite clicks in all of the internets.


Check out Brooke's tutorial for homemade gift tags. It's such a fun way to use up small scraps of fabric. (You know I'm a sucker for projects made from scraps - so resourceful). Click on over to Inchmark to download the PDF (the link to the template is embedded in her post, you can't miss it) - and make some cute tags to attach to your gifts this year.


We also loved these photo-gift tags that Sarah Nielsen created:


image via Sarahnielsen.com

Sarah is always coming up with creative solutions to everyday problems. For example: last year her little Max wanted to help hand out gifts on Christmas morning, but couldn't read the names written on the gift tags. So, Sarah designed these darling photo gift tags. The intended recipient's photo is printed on the tag so even your littlest ones will be able to know who each gift is for.


Brilliant! And, just like everything else Sarah does, these tags are completely darling. Contact Sarah through her shop to have her design a personalized set for your family.

Here's another fun present-topper/ornament idea:


A few weeks ago we got an email from Mickie who pointed us in the direction of these cool paper ornaments/present-toppers. (Links to PDF instructions below video clip) We love these for several reasons: you probably have the supplies laying around, your kids can help, and these are another great way to use up scraps! Mickie had the lovely idea to save the links from your grateful chain and use them to make ornaments for your Christmas tree - such a neat way to carry those thankful feelings through the entire holiday season.

Thanks, Mickie! We love hearing from our readers.

Thursday, December 3, 2009

Handmade Thanks {from scraps}


This is a nice time of year for sending serendipitous thank you notes. And if you're a paper lover like myself, you probably have piles of small scraps laying around which make perfect embellishments for handmade notes. This is so simple, it hardly merits posting about, but it's a fun way to make custom cards without fancy photo-shop/graphic design skills. And did I mention that I love the idea of using scraps?

I try to have blank cards, envelopes and stamps on hand at all times - makes note-writing much likelier to get done. You can buy blank stationary sets at craft stores. I bought two 50-piece sets (with envelopes) last year for just over six dollars a piece - that's 100 card/envelope sets for about $13.00; pretty economical considering that last week I spent $8.00 on twenty two not-that-cute, pre-made cards (I had oodles of thank yous to write for all the help we received with our move.)

First, I print a page of text with an assortment of greetings:

T h a n k Y o u, L o v e N o t e, L o v e Y o u,

T h a n k s, T h i n k i n g O f Y o u, H a p p y D a y


Then I go to work creating little collages of prints, solids, and text.
I like to adhere the pieces with double stick photo-mounting squares. A glue stick works, too.


A little stack makes a nice gift - a ready supply of cute cards is such a handy thing to have around.


I've seen similarly collaged cards done with scraps of fabric. Instead of using glue as your adhesive, you'd want to use fusible webbing (an iron-on adhesive) to secure your fabric to the paper.

Love these whimsical ornaments:


And these apples are sweet and simple:


So, there you have it. A few simple ways to personalize a thank you note.
Whether you use fabric or paper, a store-bought stack, a handmade note or a 3x5 card - it really doesn't matter. The most important thing is the expression of thanks.

The thing I'd love most is for this post to inspire us all to take a minute to slow down and pen a few lines of thoughtful gratitude during the busy Holiday season; if you have fun prettying up the paper - well, that's just icing.

xo,
em

**Don't Forget: Tomorrow (Friday) is the deadline to submit items for the online auction for Benson & Claire. Please e.mail us photos of the item(s) you'd like to donate, a description,
and a starting bid. And please help us spread the word so we can have lots of
bidding here on the 10th.**